Tag Archives: thermoelastic stress analysis

Seeing small changes is a big achievement

Figure 8 from Amjad et al 2022Some years ago I wrote with great excitement about publishing a paper in Royal Society Open Science [see ‘Press release!‘ on November 15th, 2017].  This has become a routine event; however, the excitement returned earlier this month when we had a paper published in the Proceedings of Royal Society of London on ‘A thermal emissions-based real-time monitoring system for in situ detection of cracks’.  The Proceedings were first published in February 1831 and this is only the second time in my career that my group has published a paper in them.  The last time was ten years ago and was also about cracks: ‘Quantitative measurement of plastic strain field at a fatigue crack tip’.  I have already described this earlier work in a post [see ‘Scattering electrons reveal dislocations in material structure’ on November 11th, 2020].  This was the first time that the size and shape of the plastic zone around a crack had been measured directly rather than inferred from other measurements.  It required an expensive scanning electron microscope and a well-equipped laboratory.  In contrast, the work in the paper published this month uses components that can be purchased for the price of a smart phone and assembled into a device not much larger than a smart phone.  The device detects the changes in the temperature distribution over the surface of the metal caused by the propagation of a crack due to repeated loading of the metal.  It is based on the principles of thermoelastic stress analysis [see ‘Counting photons to measure stress‘ on November 18th, 2015], which is a well-established measurement technique that usually requires expensive infra-red cameras.  Our key innovation is to not aim for absolute measurement values, which allows us to ignore calibration requirements, and instead to look for changes in the temperature distribution on the metal surface by extracting feature vectors from the images [see ‘Recognising strain‘ on October 28th 2015].  Our approach lowers the cost of the equipment required by several orders of magnitude, achieves comparable or better resolution of crack growth (around 1 mm) and will function at lower loading frequencies than techniques based on classical thermoelastic stress analysis.  Besides crack analysis, the common theme of the two papers is the innovative use of image processing to identify change, based on the fracture mechanics of crack propagation.

The research reported in this month’s paper was largely performed as part of the DIMES project about which I have written many posts.

The University of Liverpool was the coordinator of the DIMES project and the other partners were Empa, Dantec Dynamics GmbH and Strain Solutions Ltd.  Airbus was the topic manager on behalf of the Clean Sky 2 Joint Undertaking.

Logos of Clean Sky 2 and EUThe DIMES project received funding from the Clean Sky 2 Joint Undertaking under the European Union’s Horizon 2020 research and innovation programme under grant agreement No. 820951.

The opinions expressed in this blog post reflect only the author’s view and the Clean Sky 2 Joint Undertaking is not responsible for any use that may be made of the information it contains.

References:

Amjad, K., Lambert, C.A., Middleton, C.A., Greene, R.J., Patterson, E.A., 2022, A thermal emissions-based real-time monitoring system for in situ detection of cracks, Proc. R. Soc. A., doi: 10.1098/rspa.2021.0796.

Yang, Y., Crimp, M., Tomlinson, R.A., Patterson, E.A., 2012, Quantitative measurement of plastic strain field at a fatigue crack tip, Proc. R. Soc. A., 468(2144):2399-2415.

Image: Figure 8 from Amjad et al, 2022, Proc. R. Soc. A., doi: 10.1098/rspa.2021.0796.

Out of the valley of death into a hype cycle?

Fig 5 from Middleton et al with full captionThe capability to identify damage and track its propagation in structures is important in ensuring the safe operation of a wide variety of engineering infrastructure, including aircraft structures. A few years ago, I wrote about research my group was performing, in the INSTRUCTIVE project [see ‘INSTRUCTIVE final reckoning‘ on January 9th, 2019] with Airbus and Strain Solutions Limited, to deliver a new tool for monitoring the development of damage using thermoelastic stress analysis (TSA) [see ‘Counting photons to measure stress‘ on November 18th, 2015].  We collected images using a TSA system while a structural component was subject to cycles of load that caused damage to initiate and propagate during a fatigue test. The series of images were analysed using a technique based on optical flow to identify apparent movement between the images which was taken as indication of the development of damage [1]. We demonstrated that our technique could indicate the presence of a crack less than a millimetre in length and even identify cracks initiating under the heads of bolts using experiments performed in our laboratory [see ‘INSTRUCTIVE update‘ on October 4th, 2017].  However, this technique was susceptible to errors in the images when we tried to use low-cost sensors and to changes in the images caused by flight cycle loading with varying amplitude and frequency of loads.  Essentially, the optical flow approach could be fooled into identifying damage propagation when a sensor delivered a noisy image or the shape of the load cycle was changed.  We have now overcome this short-coming by replacing the optical flow approach with the orthogonal decomposition technique [see ‘Recognising strain‘ on October 28th, 2015] that we developed for comparing data fields from measurements and predictions in validation processes [see ‘Million to one‘ on November 21st, 2018] .  Each image is decomposed to a feature vector and differences between the feature vectors are indicative of damage development (see schematic in thumbnail from [2]).  The new technique, which we have named the differential feature vector method, is sufficiently robust that we have been able to use a sensor costing 1% of the price of a typical TSA system to identify and track cracks during cyclic loading.  The underpinning research was published in December 2020 by the Royal Society [2] and the technique is being implemented in full-scale ground-tests on aircraft structures as part of the DIMES project.  Once again, a piece of technology is emerging from the valley of death [see ‘Slowly crossing the valley of death‘ on January 27th, 2021] and, without wishing to initiate the hype cycle [see ‘Hype cycle‘ on September 23rd, 2015], I hope it will transform the use of thermal imaging for condition monitoring.

Logos of Clean Sky 2 and EUThe INSTRUCTIVE and DIMES projects have received funding from the Clean Sky 2 Joint Undertaking under the European Union’s Horizon 2020 research and innovation programme under grant agreements No. 685777 and No. 820951 respectively.

The opinions expressed in this blog post reflect only the author’s view and the Clean Sky 2 Joint Undertaking is not responsible for any use that may be made of the information it contains.

References

[1] Middleton CA, Gaio A, Greene RJ & Patterson EA, Towards automated tracking of initiation and propagation of cracks in Aluminium alloy coupons using thermoelastic stress analysis, J. Non-destructive Testing, 38:18, 2019.

[2] Middleton CA, Weihrauch M, Christian WJR, Greene RJ & Patterson EA, Detection and tracking of cracks based on thermoelastic stress analysis, R. Soc. Open Sci. 7:200823, 2020.

Scattering electrons reveal dislocations in material structure

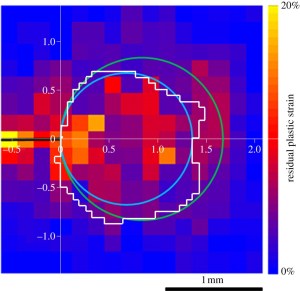
Figure 9 from Yang et al, 2012. Map of plastic strain around the crack tip (0, 0) based on the full width of half the maximum of the discrete Fourier transforms of BSE images, together with thermoelastic stress analysis data (white line) and estimates of the plastic zone size based on approaches of Dugdale's (green line) and Irwin's (blue line; dimensions in millimetres).

Figure 9 from Yang et al, 2012. Map of plastic strain around the crack tip (0, 0) based on the full width of half the maximum of the discrete Fourier transforms of BSE images, together with thermoelastic stress analysis data (white line) and estimates of the plastic zone size based on approaches of Dugdale’s (green line) and Irwin’s (blue line; dimensions in millimetres).

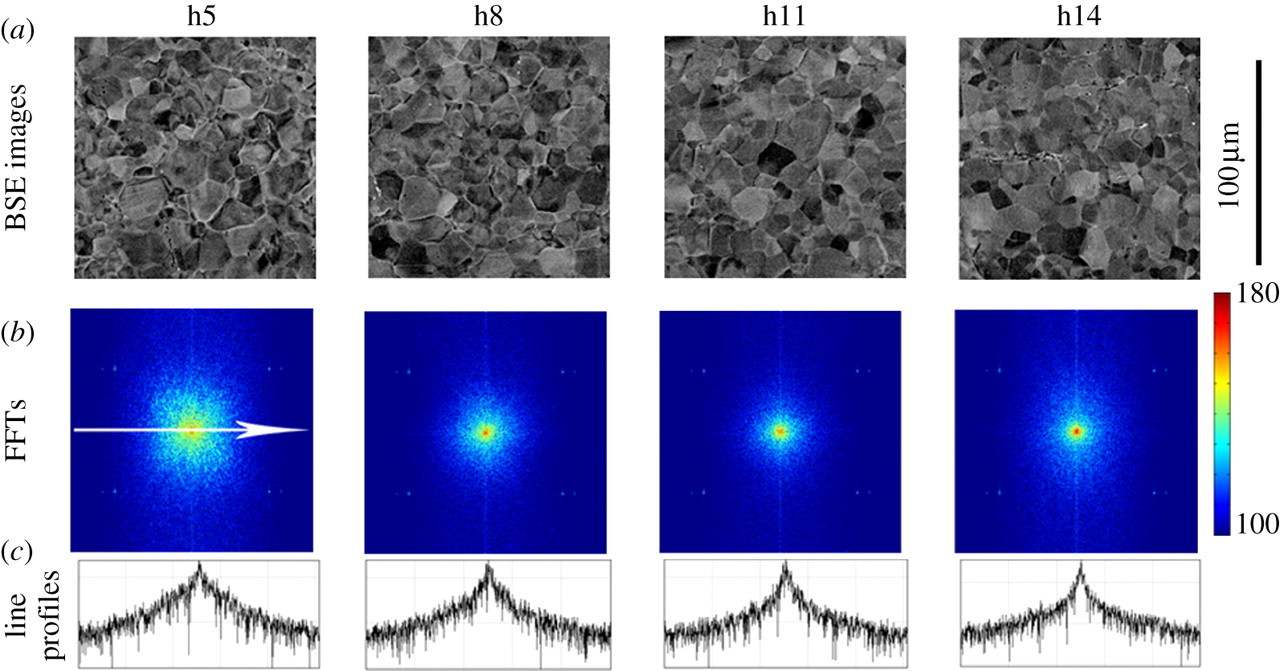
It is almost impossible to manufacture metal components that are flawless.  Every flaw or imperfection in a metallic component is a potential site for the initiation of a crack that could lead to the failure of the component [see ‘Alan Arnold Griffith’ on April 26th, 2017].  Hence, engineers are very interested in understanding the mechanisms of crack initiation and propagation so that these processes can be prevented or, at least, inhibited.  It is relatively easy to achieve these outcomes by not applying loads that would supply the energy to drive failure processes; however, the very purpose of a metal component is often to carry load and hence a compromise must be reached.  The deep understanding of crack initiation and propagation, required for an effective and safe compromise, needs detailed measurements of evolution of the crack and of its advancing front or tip [depending whether you are thinking in three- or two-dimensions].  When a metal is subjected to repeated cycles of loading, then a crack can grow incrementally with each load cycle; and in these conditions a small volume of material, just ahead of the crack and into which the crack is about to grow, has an important role in determining the rate of crack growth.  The sharp geometry of the crack tip causes localisation of the applied load in the material ahead of the crack thus raising the stress sufficiently high to cause permanent deformation in the material on the macroscale.  The region of permanent deformation is known as the crack tip plastic zone.  The permanent deformation induces disruptions in the regular packing of the metal atoms or crystal lattice, which are known as dislocations and continued cyclic loading causes the dislocations to move and congregate around the crack tip.  Ultimately, dislocations combine to form voids in the material and then voids coalesce to form the next extension of the crack.  In reality, it is an oversimplification to refer to a crack tip because there is a continuous transition from a definite crack to definitely no crack via a network of loosely connected voids, unconnected voids, aggregated dislocations almost forming a void, to a progressively more dispersed crowd of dislocations and finally virgin or undamaged material.  If you know where to look on a polished metal surface then you could probably see a crack about 1 mm in length and, with aid of an optical microscope, you could probably see the larger voids forming in the material ahead of the crack especially when a load is applied to open the crack.  However, dislocations are very small, of the order tens of nanometres in steel, and hence not visible in an optical microscope because they are smaller than the wavelength of light.  When dislocations congregate in the plastic zone ahead of the crack, they disturb the surface of the metal and causing a change its texture which can be detected in the pattern produced by electrons bouncing off the surface.  At Michigan State University about ten years ago, using backscattered electron (BSE) images produced in a scanning electron microscope (SEM), we demonstrated that the change in texture could be measured and quantified by evaluating the frequency content of the images using a discrete Fourier transform (DFT).  We collected 225 square images arranged in a chessboard pattern covering a 2.8 mm by 2.8 mm square around a 5 mm long crack in a titanium specimen which allowed us to map the plastic zone associated with the crack tip (figure 9 from Yang et al, 2012).  The length of the side of each image was 115 microns and 345 pixels so that we had 3 pixels per micron which was sufficient to resolve the texture changes in the metal surface due to dislocation density.  The images are from our paper published in the Proceedings of the Royal Society and the one below (figure 4 from Yang et al, 2012) shows four BSE images along the top at increasing distances from the crack tip moving from left to right.  The middle row shows the corresponding results from the discrete Fourier transform that illustrate the decreasing frequency content of the images moving from left to right, i.e. with distance from the crack.  The graphs in the bottom row show the profile through the centre of the DFTs.  The grain structure in the metal can be seen in the BSE images and looks like crazy paving on a garden path or patio.  Each grain has a particular and continuous crystal lattice orientation which causes the electrons to scatter differently from it compared to its neighbour.  We have used the technique to verify measurements of the extent of the crack tip plastic zone made using thermoelastic stress analysis (TSA) and then used TSA to study ‘Crack tip plasticity in reactor steels’ [see post on March 13th, 2019].

Figure 4 from Yang et al, 2012. (a) Backscattered electron images at increasing distance from crack from left to right; (b) their corresponding discrete Fourier transforms (DFTs) and (c) a horizontal line profile across the centre of each DFT.

Figure 4 from Yang et al, 2012. (a) Backscattered electron images at increasing distance from crack from left to right; (b) their corresponding discrete Fourier transforms (DFTs) and (c) a horizontal line profile across the centre of each DFT.

Reference: Yang, Y., Crimp, M., Tomlinson, R.A., Patterson, E.A., 2012, Quantitative measurement of plastic strain field at a fatigue crack tip, Proc. R. Soc. A., 468(2144):2399-2415.

Condition-monitoring using infrared imaging

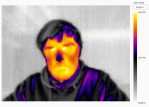
If you have travelled in Asia then you will probably have experienced having your health monitored by infrared cameras as you disembarked from your flight.  It has been common practice in many Asian countries since long before the COVID-19 pandemic and perhaps will become more usual elsewhere as a means of easily identifying people with symptoms of a fever that raises their body temperature.  Since, research has shown that infrared thermometers are slightly more responsive as well as quicker and easier to use than other types of skin surface thermometers [1].  In my research group, we have been using infrared cameras for many years to monitor the condition of engineering structures by evaluating the distribution of load or stress in them [see ‘Counting photons to measure stress‘ on November 18th, 2015 and  ‘Insidious damage‘ on December 2nd, 2015].  In the DIMES project, we have implemented a low-cost sensor system that integrates infrared and visible images with information about applied loads from point sensors, which allows the identification of initiation and tracking of damage in aircraft structures [2].  I reported in December 2019 [see ‘When seeing nothing is a success‘] that we were installing prototype systems in a test-bench at Empa.  Although the restrictions imposed by the pandemic have halted our tests, we were lucky to obtain data from our sensors during the propagation of damage in the section of wing at Empa before lockdown.  This is a landmark in our project and now we are preparing to install our system in test structures at Airbus once the pandemic restrictions are relaxed sufficiently.  Of course, we will also be able to use our system to monitor the health of the personnel involved in the test (see the top image of one of my research team) as well as the health of the structure being tested – the hardware is the same, it’s just the data processing that is different.

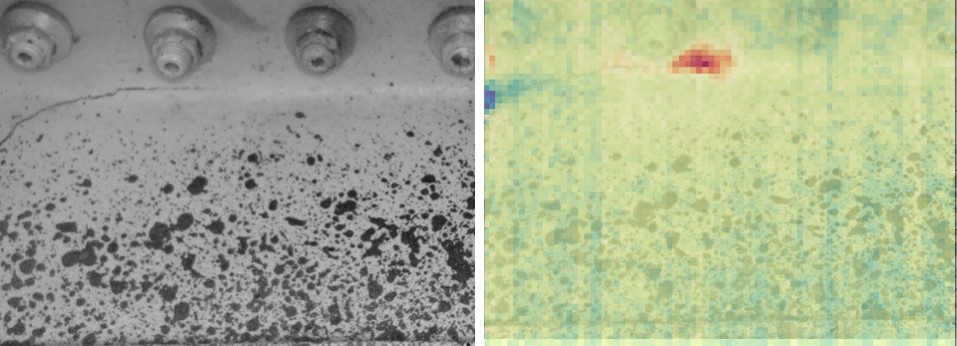
The image is a composite showing images from a visible camera (left) and processed data from infrared camera overlaid on the same visible image (right) from inside a wing box during a test at Empa with a crack extending from left to right with its tip surrounded by the red area in the right image.  Each nut in the image is about 20 mm in diameter and a constant amplitude load at 1.25 Hz was being applied causing a wing tip displacement of 80 mm +/- 15 mm.

The University of Liverpool is the coordinator of the DIMES project and the other partners are Empa, Dantec Dynamics GmbH and Strain Solutions Ltd.

The DIMES project has received funding from the Clean Sky 2 Joint Undertaking under the European Union’s Horizon 2020 research and innovation programme under grant agreement No. 820951.


The opinions expressed in this blog post reflect only the author’s view and the Clean Sky 2 Joint Undertaking is not responsible for any use that may be made of the information it contains.

References

[1] Burnham, R.S., McKinley, R.S. and Vincent, D.D., 2006. Three types of skin-surface thermometers: a comparison of reliability, validity, and responsiveness. American journal of physical medicine & rehabilitation, 85(7), pp.553-558.

[2] Middleton, C.A., Gaio, A., Greene, R.J. and Patterson, E.A., 2019. Towards automated tracking of initiation and propagation of cracks in aluminium alloy coupons using thermoelastic stress analysis. Journal of Nondestructive Evaluation, 38(1), p.18.